Friday, February 26, 2010

Challenged

Another Stamp-2-Spend challenge today. :) Today's was to create a card by CASEing (the sweet way stampers have of saying 'copying') one in the SCS gallery. Mine didn't turn out anything like the card I was CASEing, but I like what it looks like. I use my CASEing as more of 'inspiration' rather than copying because I ALWAYS have to change SOMETHING. Yeah, I'm that much of a control freak. :)


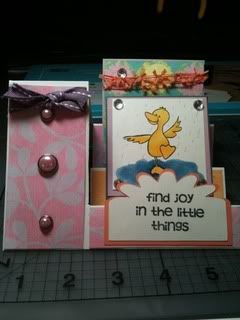
The card I chose to case is here. Because I've never seen a card quite like this, I searched for instructions on how to put together this most interesting creation. I found my instructions here. It's called a 'sidestep' card. I would like to make a tutorial for one of these some day. The tutorial that I used was good, but it used centimeters rather than inches, and that took a bit of extra work for me - the only thing I had with cm on it was my cutter!
Photobucket


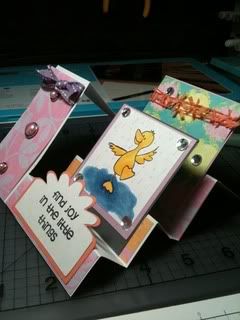
The card was created with designer paper from The Paper Studio, stamps from Clear Dollar Stamps and SU, and cardstock from SU. Ribbon, fiber, brads, a glitter gel pen, Copics, and adhesive bling helped give this card some spark and flair. Oh, and the Cricut and SCAL were used to create the little 'sentiment' box on the front of the card.


A side view of this card.

Photobucket


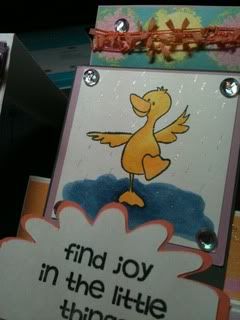
Up close on the raindrops and little duck (from Clear Dollar ... I love that duck!!!).

Photobucket


Please let me know what you think. I really had fun with this one and went outside my comfort zone. I don't use a lot of designer paper (although, I have a TON of it in the Haven), and I've never made a card quite like this before.


Have an awesome Friday night - go on over to SCS and play the VSN challenges. Fun stuff right there!! Oh, and have a great, big, beautiful tomorrow!!!

Monday, February 22, 2010

Happy 50th and a Challenge

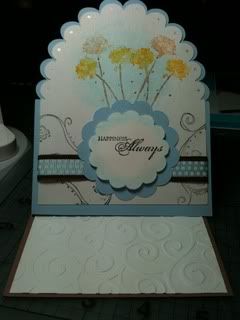
The Stamp-2-Spend challenge a couple of weeks ago was to create a card using the colors on your favorite (or one of your favorites) book. The 7th book in the 39 Clues series came out on February 2nd, and I used it for my inspiration. The colors were brown, gold/yellow, orange, and blue. The card I chose to create was for the 50th anniversary of my cousin (hope she doesn't look here!!!) in March. Because I'm completely taken with the tent cards at the moment, I ran off in that direction with my creative mojo. :)

Photobucket


All colored paper is from SU. The flowers were colored on the stamp with Watercolor Wonder Crayons and spritzed with water before stamped. The card front and white layer were cut with SCAl, as were the scalloped circles. The stamps and sentiments are from SU. The ribbon is from an unknown source. A Gelly Rollz clear glitter pen was used for the little sparkle dots around the scallops.


Photobucket


The inside was embossed with the Cuttlebug. I think the embossed white is just classy. :)


I will try to post again on Thursday night, but it will probably be Friday. I am presently on my way to see my oldest son - my Marine - graduate from the training school he's been in since December.

Thank you for your continued support of my blog!!! I still need thoughts, comments, suggestions, and preferences on what is offered here. :)


Have a wonderful Monday and a great, big, beautiful tomorrow!!!

~*Shell*~

Saturday, February 20, 2010

Punch Me Not

Do you have punches that you just LOVE .... until you try them with a stamp set and find the punch to be just a tad (or a TON) too small?? Well, a solution is coming your way if you have the Cricut and SCAL (or MTC).


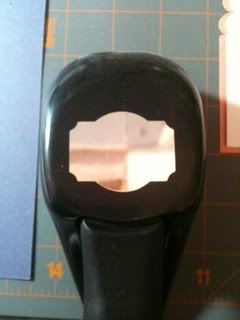
Here's a punch that I love to use ....

Photobucket


It is, however, quite small. :( So....I punched a piece of white, scrap paper. I placed that punch on a piece of dark paper....

Photobucket


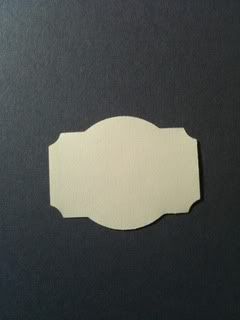
From there, the image was taken into a graphics editing program (I use Jasc Paint Shop Pro, but Gimp is a great, free option), and the punch image was rotated until straight and colors were inverted ....


The image was then saved as a .jpg file, traced into SCAL, and made an .scut file. From there, I could size it as I wished - and create a shadow, as well.

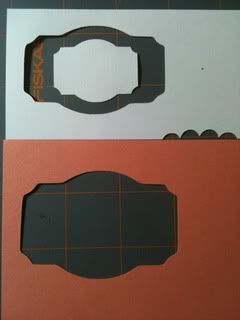
This image shows the original punch inside the white cut out from the SCAL cut and the cut from the shadow in the peach color.

Photobucket


The final result of this cut ....

Photobucket


Hopefully, this will help you make the most of your favorite punches - even if they are a little small or a little big for what you need.


As a hint, this method can sometimes work with stamped images, too. ;)


I had an awesome day today. I hope you did, too, and that you have a great, big, beautiful tomorrow!! :)


~*Shell*~

Friday, February 19, 2010

Tent Card

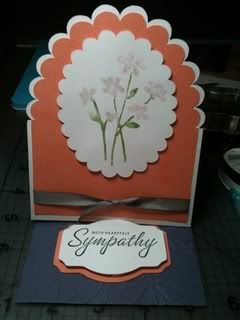
I love the look of tent cards, don't you?? I just couldn't leave the idea alone, though. A few minutes with SCAL, and a new favorite was created.

The outside of the card....


Photobucket


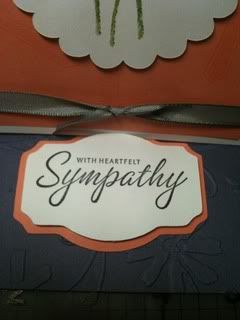
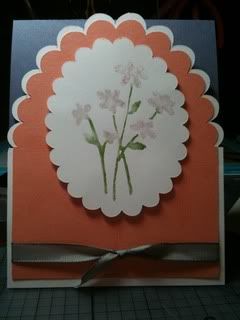
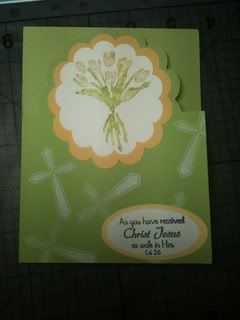
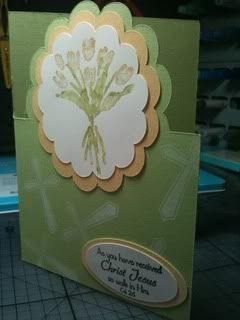
The card uses all SU paper and is cut using SCAL. The base is 4 1/4 x 51/2 with the fold at the top going across the 4 1/4 inches. The flowers were colored on the stamp (from Close as a Memory) with Watercolor Wonder Crayons and spritzed with water. Gray taffeta ribbon was added at the bottom of the front layers. A cross from an unmounted set was used to create a background by stamping it randomly on the layer with VersaMark.

There is a fold 1/2 way down the 5 1/2 inch front. The colored scalloped layer is adhered to the bottom 1/2 of that card front. When the card is open, it makes a tent - like a name card that sits in front of a chair at a dinner table. The bottom of the card on the inside was embossed with the Cuttlebug.

Photobucket


The punch with the sentiment was created on my Cricut using SCAL. I will put up a short tutorial on that either tomorrow or Sunday. Tomorrow is our Family Fun Day for February, and I'm in charge this time! :)

Please, let me know what you think about this card! I enjoyed creating it, but hated the reason for it.


Have a wonderful Friday night and a great, big, beautiful tomorrow.


~*Shell*~

Thursday, February 18, 2010

Remnants and Opinions

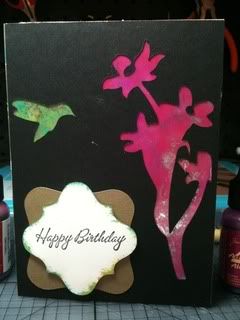
As mentioned earlier this week, I used the remnants of my hummingbird silhouette to create another card.


Photobucket


The remnant was placed on a card made using glossy cardstock (SU). The glossy layer was colored using an alcohol ink technique from Technique Junkies (link to the right --->). Half of the card used the reds and purples, but the other half (where the bird was), used greens and blues. The inks are made by Ranger.


Now, I need YOUR help! Please post a comment on this post to let me know what you want to see here on my blog - creations, tutorials, news, etc. Please be specific, too. If you want tutorials, let me know what KIND of tutorials you'd like to see. The same with creations and news. I really would appreciate your help!! Thank you so much for visiting my blog and for helping me make this more useful for you.


Have a wonderful night and a great, big, beautiful tomorrow.


~*Shell*~

CDS Font Update and New Cartridges!

Cricut Design Studio has a new font pack update available. You can find it here. It does not update your program, only the cartridges and the images.

Included in the new update are the new cartridges coming out in March and April:

-Give A Hoot
-Just Because Cards
-Preserves
- Straight From the Nest (available only through HSN)
-Serenade


Also, several fonts are being 'retired':

-Blackletter
-Sans Serif
-Christmas
-Street Sign


To see the new cartridges, you can go to Cricut.com and click on Products, or look at the images in the Design Studio after updating your font pack. :)


Another post coming your way tonight. :)


Have a great afternoon.

*~Shell*~

Wednesday, February 17, 2010

Jonah's Valentine Creations

I mentioned on SCS that my son made cards to send two long-distance friends, and several asked to see them. I didn't want to share them until I was sure they were received by the girls, and now, I know that they did get them last weekend.

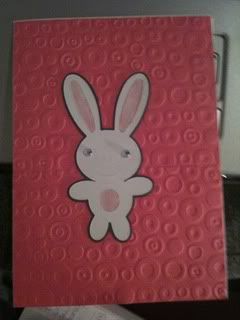
Both cards were made with Cricut images. This one uses SU paper and a pink Copic marker to color his tummy and ears. The wiggly eyes add just a little extra dimension. The background is embossed with the Cuttlebug. The bunny image came from New Arrival, I believe.

Photobucket


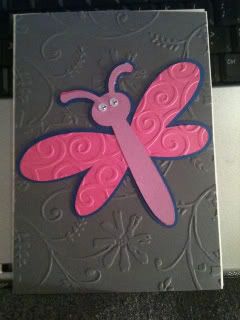
Doodlecharms gave Jonah the image of the dragonfly for this card. He used the Cuttlebug to emboss not only the background, but the wings. After adding a shadow and wiggly eyes, this card was complete. He actually got this idea from a card sent to me a couple of years ago by The Pink Stamper. :)


Photobucket


These will be the last cards from Jonah for a while, I think, but I wanted to make sure that everyone realizes just how easy it is to use the Cricut. Jonah is only 13, but he loves cutting the shapes with that machine. I think he can put cards together pretty darn well, too. :)


Tomorrow, I will have a special post asking for some of your opinions. I hope that you will respond and let me know what you're thinking.


Have an awesome day and a great, big, beautiful tomorrow!!

~*Shell*~

Tuesday, February 16, 2010

Black and White

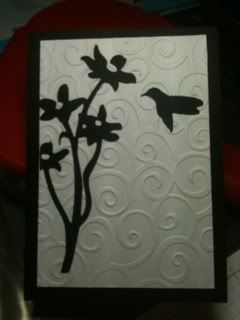
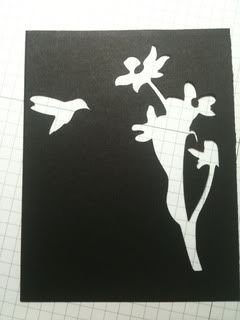
My mother loves hummingbirds, and I wanted to do a Valentine's card with that in mind. I found this image when searching for hummingbird silhouettes. The image was copied into Jasc Paint Shop Pro, converted to black and white - with very few tweaks, saved as a .jpg file, and traced into SCAL. After cutting the image, I had the beautiful silhouette pieces, as well as the 'scrap' piece from the cut out.


Photobucket

My mom's card used only black and white SU paper. The Cuttlebug was used to emboss the background.


The remnant piece looks like this ....

Photobucket


Throw it away? Not a chance. Later this week, I will show what I did with that piece. :) So, stay tuned.


Have a wonderful Tuesday and a great, big, beautiful tomorrow!! :)

~*Shell*~

Saturday, February 13, 2010

Baby Card by Jonah

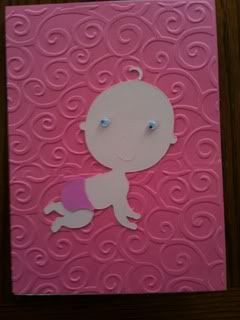
My son is almost 14, and recently, he became the new owner of my little Cricut. I knew that he would enjoy creating something with a pretty cool tool. When we got word that baby Kenzie's birth was imminent, he decided to make a card to welcome her into the world. He got out the Cricut and got to work.

Photobucket

He used New Arrival for the baby and the baby diaper. The baby and diaper are cut using paper from SU. Then, he added some wiggly eyes to add some dimension. The background is embossed using the Cuttlebug.

I think he did an awesome job with this and that it turned out super cute. What do you think?? :)


We had about 6 inches of snow on the ground this morning, so we spend the morning playing. :) It was great fun.


Have an awesome Saturday and a great, big, beautiful tomorrow!!

~*Shell*~

Friday, February 12, 2010

Welcome Baby Kenzie!

I had planned a different post for yesterday/today, but my plans changed when I found out that my new great-niece was going to be born a week earlier than we expected (she was scheduled for a C-section NEXT Friday). Her taggy blanket was made, but I still needed to make her card.

Photobucket


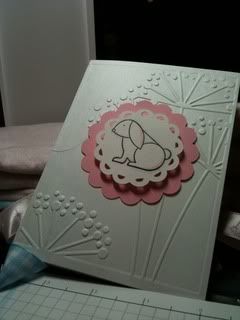
The scallops were cut using the Cricut, SCAL and the Kut-Up font featured a few posts ago. The bunny is from Bitty Baby Blessings by Papertrey Ink and was stamped in Memento Tuxedo Black. It was colored and shaded using Copics and mounted on the pink scallop with pop dots. The background was embossed using the Cuttlebug on white cardstock. It's a simple card, but I prefer simple, fresh, and clean for a baby card.

It's snowing here today. :) Perhaps, after I get a nap, I will work in the Haven .... or just enjoy a snow day with my kiddos. :)


Tomorrow - the card that Jonah (my 13 year old) made for the new baby.


Have a fantastic Friday and a great, big, beautiful tomorrow!!!!!


~*Shell*!

Wednesday, February 10, 2010

Happy Valentine's Princess!!!

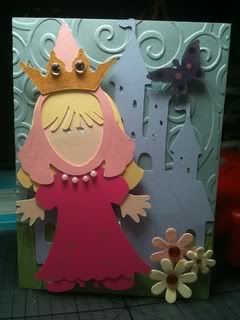
For my princess, I wanted a card that she would just love. I think I accomplished that with this little doll ... :)

Photobucket

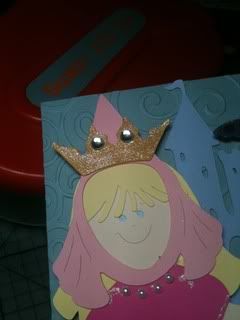
The entire creation (with the exception of the background embossing, flowers, butterfly, and bling) was done on the Cricut using Cricut Design Studio and the Paper Dolls Dress Up cartridge. All of the paper is from SU. The doll was cut at around 4 inches with all of the layers done proportionately. The castle was cut to fit as big as possible (while keeping proportions) on a 4x5 1/2 inch card. The backgrounds were embossed with the Cuttlebug. The butterfly was a scrap piece of chipboard from a stencil my daughter was using for her Valentines. :) The flowers came from Hobby Lobby and are put on pop dots for dimension. Some self-adhesive crystals were used on the crown, and some self-adhesive pearls were used on the dress. My Gelly Roll clear glitter pen (LOVE that sweet little jewel!!) was used to bling up the crown and to place flowers on the dress. It was even used to add a little bling to the butterfly.


Photobucket

Paper piecing can be tedious to me, but with pieces this large, it was actually pretty fun.

Photobucket


Can't wait to hear what you think! :) I really should have made the card a castle-shaped card.....


Have a great night and a great, big, beautiful tomorrow.


~*Shell*~

Tuesday, February 09, 2010

Valentine Rocker!

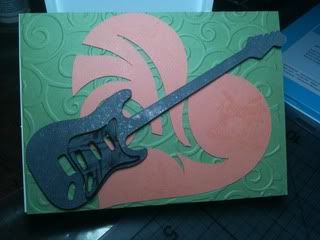
Valentine's Day is coming up quickly! Have you gotten your design(s) together for your cards!? This year, I needed 7 cards. I think that's the most I've needed since I was, like, 10. LOL!! Anyway, I got started on them the other day with my older son's card. I've not shared it on here, yet. The next card was for my niece, and the one for today is the one I did for my younger son.


The images are from the Indie Art cartridge (which I own), but were actually cut using SCAL. The interface on SCAL makes it a bit easier for me to work with than the Design Studio, so I imported the images and cut from SCAL

.Photobucket

This is another simple card with very little stamping involved, but I really like the way the card came out. All paper is from SU. The guitar is spritzed with Glimmer Mist, and the heart is stamped in VersaMark with a drum set image from a clear set (unknown manufacturer). The background is embossed with the Cuttlebug swirls folder. Black ink was used around the middle section of the guitar, and that section was put on double pop dots. Pop dots were used on the main part of the guitar, too.


So, so you think my 13 year old will like it?? :)

Tomorrow ... the card for my 4 year old daughter.

Have a wonderful night and a great, big, beautiful tomorrow.


~*Shell*~

Monday, February 08, 2010

Happy Valentine's Day!

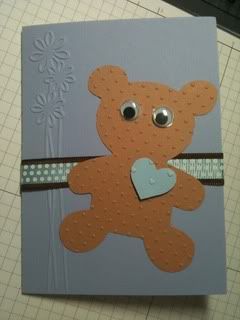
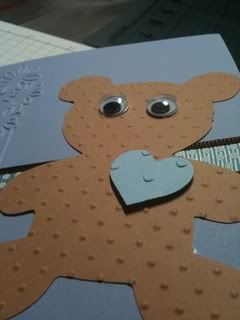
No stamping on this card, but it does work for a challenge on SCS. The challenge (on the Stamp to Spend thread) was to create a Valentine's card in non-traditional colors (the challenge). I needed a card for my 2 year old great niece, and I used the challenge to inspire my colors. YES. It is an out-of-the-ordinary combination, but I really like the way it looks. I think the brown bear could go on anything, though.

The bear and heart were cut using SCAL. I used the bear from this page, imported it to Paint Shop Pro, saved as a .jpg, and traced it in SCAL. The heart is in the basic shape library of SCAL. Photobucket Background, bear, and heart were embossed with the Cuttlebug. I love that little 'edge' embossing folder! It added the perfect touch on this card.

You can't tell the colors very well on this picture, but they are creamy caramel, blissful blue, and almost amethyst - all SU paper and colors.

Another view - Photobucket


Let me know what you think. :)

Have an awesome night, sleep well, dream big, laugh often, smile much, pray incessantly, and have a great, big, beautiful tomorrow. :)


~*Shell*~

Saturday, February 06, 2010

Easter Already?!

Well, not quite, but I need to get ready. I need to make about 25 Easter cards for our deacon families at church. Getting started early would help me have plenty of time to work on a good design and would allow me to not do them in a rush.

Using SCAL and my KutUps font, I created a unique card. Welded together are 2 rectangles and a scalloped oval. The card base is 4 1/4 x 5 1/2 to fit a standard envelope.

Photobucket


The layers were created in SCAL to perfectly match the scallop on the card.

A better view of the 'cut' card is here ...
Photobucket


Watercolor Crayons (SU) were used to color the stamped flowers and stems. Memento was used on the sentiment. The sentiment ovals were cut using SCAL, as well, because my punches were too small. The inside sentiment is "Easter Blessings" from the Never Ending Joy set that SU has. The cross, stamped in white SU craft ink, is from an unmounted inspirational set, and the sentiment on the outer part of the card is from Beautiful Scriptures, a set made by Clear Dollar Stamps.


As always, I'd love to hear what you think of the card. I still need to make the other 20 - 23 of them, but at least I have a prototype now. :)


Have a fantastic weekend and a great, big, beautiful tomorrow!!! :)


~*Shell*~