Tuesday, December 24, 2013

Merry Christmas!

Happy Christmas Eve!! :)  
I wanted to share the Christmas cards I made this year for my stamping friends.  


This was the first one and it turned out just a little different from the others.  I really liked these cards.  They were cute, but simple to put together.


Since I couldn't get one of these out to all of you, I want to use this post to wish each of you a Merry Christmas filled with the joy that only the Savior can bring.  

Going to spend Christmas Eve at my church. :)  That service is my very favorite of the year.

Have a wonderful Christmas Eve and a great, big, beautiful tomorrow.


~*Shell*~


Thursday, November 07, 2013

Birthday Challenge

 I just love this little Fhiona.  Her windy fall  scene is just precious and perfect for our recent weather.  So, using this adorable stamp, I created this card for a special friend/family member in NJ.  

There may be a little too much orange on this, but, over all, I really like it.


I embossed the background layer with some swirling leaves and added some pearls as the centers to some of the flowers on the border die cut.


I totally love the corner die.  It just wraps around the image so well and adds so much.

Fhiona is colored with Copics and the background was airbrushed.  The sentiment layer was, also, airbrushed.

The inspiration for this card was from the Your Next Stamp Challenge.  I chose the sketch for inspiration.

Have a beautiful day! :) 

~*Shell*~


Saturday, November 02, 2013

A Little Bit of Crafting....

Creation time!!  Yippee!  I didn't get to create much during October. Well, at least not with paper.  I did a lot of fabric work and even made a ship costume for .... a horse. Yep.  My daughter was a pirate and needed the horse she was riding to be a ship.  That took quite a bit of time.  But ... she and Sly won 1st place! :)

This card was suppose to be to the recipient yesterday, but that just didn't happen.  Hopefully, she will still like it when it gets there this week.

It's a simple card, but I worked hard on the airbrushed background.  I love the effect the airbrush has. It's so smooth.  


The stamps were all from SU.  They certainly gave the effect that I wanted.  The silhouette of the flowers along with the background just work well together, I think.


I hope all of you are having a great Saturday.  It's really hard for me to believe that it's already November.  At least, I get an extra hour of sleep tonight. :)


~*Shell*~

Friday, October 04, 2013

Need a Little Pick Up

Tomorrow, we are attending a 90th birthday party for a very sweet man, the father of one of our closest friends.  It's been a while since I've needed a masculine card, so this one was both a bit of a challenge and a refreshing change.


The little pick-up truck is an old SU stamp, but it's just great for guy cards.  The background paper is embossed with gears, and the little banner used the same folder.  I directly inked the raised parts of the gears on the banner to bring out the detail.  I distressed the edges of the background with the airbrush.


The banner looked pretty empty, but then, I remembered the keys that I have stashed away.  I picked a small, light one, and it works perfectly for the embellishment here.


The blue and brown background colors on the image layer were done with the airbrush.  I colored the truck first and then, masked it to airbrush over and around it. The truck layer was cut out using a Spellbinder's die.


The small 'pearls' at the bottom were white originally.  The airbrush was used to change them to a dark brown.  What a difference it made.  I love how these turned out.  Hemp twine was also used to embellish the card.


No challenge for this one....just a fun card to create.  I hope that he really likes his card.


Have a peaceful Friday evening and a great, big, beautiful tomorrow!


~*Shell*~

Thursday, October 03, 2013

Day Dreaming ....

Had time to create today.  I only got one card done, but I really like how it turned out.  Because I only worked on one card, I just did one challenge.  It's for the Your Next Stamp challenge, and I turned the sketch a bit to make it work with the image.


I used the Dreaming of You set (Your Next Stamp) and colored with Copics (of course!).  The butterfly is part of the spring die set from Your Next Stamp, as well as the kite, and individual flowers.  


The background on the image layer was done with the airbrush.  I'm getting more control of it and I was pleased with the effect I got after practicing a bit.  The banner on the side was embossed with flowers, and then, the raised areas were inked with white craft ink.

Your Next Stamp - sketch

Hope you're having a great week!  The weekend is on it's way ... but it looks like there's a hurricane heading our way.  Guess we'll have some rain. :)  My garden could use it.

Enjoy your Thursday night and have a great, big, beautiful tomorrow.


~*Shell*~


Wednesday, October 02, 2013

Cute Little Pouch Tutorial

After creating my little taggie owl yesterday, I worked on some little denim pouches.  These are great to use for any little things - spools, buttons, bobbins, crayons, etc - and SO easy to make.
Aren't they cute?!

So, ready to make your own?? 

Supplies - 
old pair of jeans (actually, only one leg of the jeans)
scissors/rotary cutter
sewing machine
iron
thread


Step 1 - cut the leg of the jeans to the size that you'd like to use.  


This one is about 7 inches tall.  I used a pair of my daughter's old jeans, so it is fairly narrow - about 6 inches.  
Cut both ends fairly straight.


Step 2 - sew the bottom closed.


Stitch the bottom closed.  I just used a regular straight stitch.


Step 3 - stitch another seam right next to the last one.


This is to reinforce the seam since it's denim and will have things inside.


Step 4 - iron the seam open.


This is kind of hard with the denim seams, but it helps with the next step.


Step 5 - iron a small crease into the corners to use as a guide for sewing the boxed corners. 


This just assists in keeping the right shape when you sew it.

Step 6 - sew the boxed corners


Sew across the corner - try to make the distance from the corner even on each side.  Do this on both sides.


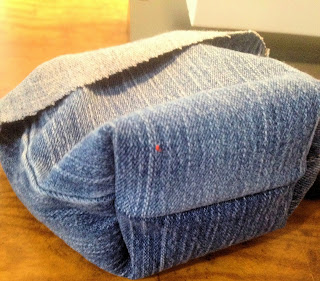
Step 7 -  flip right side out.

After boxing the corners (like in picture above), flip the pouch so that the right side is facing out.


Step 8 - fold down the top to make a cuff.


You can cuff it to the inside to finish the top if you wish.  I like the unfinished denim edge showing.


Step 9 - embellish.


Add some cute flowers or buttons to embellish your pouch.

And ... you're done!


This is a very easy project ... easy enough that my 8 year old made one by herself.


Please let me know what you think of these little pouches and of the tutorial.  Let me know if you have questions or suggestions!


Have a wonderful Wednesday and a great, big, beautiful tomorrow!!


~*Shell*~


Tuesday, October 01, 2013

Fabric Fun Day

I took today to create with fabric.  I'll get some cards done later this week.  I've had an idea in my head for quite a while about a little 'taggie' owl for little ones.  I didn't have a pattern, but found a simple owl outline online to use as a guideline.  I added some as I cut him out for the seam allowance. I hope to make a pattern and improve on the design (and sewing!) later, but I'm pretty happy with the prototype.  


Here's our little owl buddy with his wings closed.


And here he is with his wings open.  Yes, I realize that I needed to change thread for the dark part of the eyes, but I was being lazy ... :)  I think the wings ended up a good size, and I'm pleased with having ribbon feet.  The main body part is fleece with cotton wings and a fuzzy middle section. He has batting in his wings and Polyfil in his main body section.  His beak is a small piece of minky.


So ... what do you think??? :) 


Have a wonderful Tuesday and a great, big, beautiful tomorrow.


~*Shell*~


Friday, September 20, 2013

Birthday Cake Pop

I managed to get up in the Haven today. :)  A friend is having a birthday next week, and I wanted to get a card done for her.  I'm not sure if I will get it to her on time, but I'm gonna try.

Today, I used Cake Pop Fhiona from Your Next Stamp.  She's just so cute!!! 


Miss Fhiona is colored with Copics ..... but I bet you had that figured out! :) The background on the image layer was done with the air brush.  I added a few sprays from other colors to give it a festive feel.  


The pink layer is embossed with big polka dots and that precious lace is used to embellish the sentiment layer.  I used some YNS dies to embellish the top of the card and a big flower for the bottom.  

Challenges - 
Your Next Stamp - sketch
Penny's Paper-Crafty Challenge - two or more patterned papers
Divas By Design - anything goes
Oldie but a Goodie Challenge - dies and punches (the gray background paper is ..... years - yes, YEARS - old. :) )
Challenges 4 Everybody - anything goes
CMC Copic Challenge Group - anything goes 


This was a fun card to create.  I hope my friend likes it and that it helps her celebrate her special day!

Have a wonderful Friday and a great, big, beautiful tomorrow!!


~*Shell*~

Thursday, September 12, 2013

Thank You!

I am such a very blessed person ... and sometimes, I can't get over how blessed I am.  A friend found out that I really wanted the Copic airbrush system, and because she's never used the one she has, she sent it to me!  It arrived on Tuesday, but I only had time to get it set up and give it a short trial run.  Today, though, I played with it a bit more.  It's going to take me a little while to practice, but it's such a great addition to my crafting tools.  

So ... today, I worked on a thank you card for my friend.  I don't think I can possibly thank her enough, though.

The image was printed some time ago from the web.  He was colored with Copics ... duh. :)   The blue and green on the image layer were done with the airbrush, as well as the flowers at the top.  The wings of the bee are embellished with a glitter pen.  The sentiment layers were cut with Clear Dollar Stamps' dies (Designer Label Dies) and stamped with an old SU set.  The gray background is embossed with a cute folder that has little bugs and hearts on it.

I hope my friend feels a touch of how much I appreciate her generosity.

I'm entering this into the CiSC Thank You challenge.

Ok .... off to work on goody bags for a very special princess' party.  I hope all of you have a great Thursday and a great, big, beautiful tomorrow!!!

~*Shell*~

Thursday, September 05, 2013

In the Nick of Time

It wasn't really my plan for the day, but I created another card for the challenge  As I started working in the Haven and the Seam today, I had an idea for a card bouncing around in my head.  So, during a break from other creations, I put this one together.  It's actually a baby card.  I have a friend having her first baby soon, and I knew I needed a card for her for the shower in a few weeks.  


She said that the walls of the baby's room are going to be gray and the accents will be coral, yellow, purple, and green, so this is what I came up with.  The butterflies and flowers are all dies from Your Next Stamp.


I altered the inspiration sketch a bit by making the image layer square instead of round.  It just worked well with the butterflies.  

It's kind of simple, but I like how it turned out.  Not a typical baby card.  I hope she likes it. :) :)

What do you think?

I also found a couple of other challenges that this card fits...

Your Next Stamp - Sketch
Sister Act - Anything Goes
Perfect Sentiments - Ribbon, binding, or baker's twine (with sentiment on front)


I worked with a lot of fabric today.  That was fun.  Hoping I'll get to create tomorrow and Saturday.  I probably won't get a lot of time next week.  We'll see.  I need my creating time! :) :)

Hope ya'll have had a super Thursday and that you have a great, big, beautiful tomorrow!

~*Shell*~


Tuesday, September 03, 2013

Cake Pop Challenge

Another challenge card for you this morning.  I created this sweet card yesterday during my unexpected time in the Haven.  I love pink and brown together, so I went with that as my color scheme.  


I gave it some texture with the tattered ribbon and embossed brown layer.  I stamped the sentiment "It's time to Celebrate!" on the ribbon.


I wanted something a little different for the embellishments on this one, so I looked for some buttons that might work.  I liked the feel with these.  Fhiona is, of course, colored with Copics.


Time at home today, so hopefully, I'll get to create a bit!  What are you doing today??

Have a happy Tuesday and a great, big, beautiful tomorrow!!


~*Shell*~

Monday, September 02, 2013

Groovy Gal

Happy Labor Day!  I hope everyone found time to do something they love today.  We were suppose to take the kids to piano lessons today, but that got canceled at the last minute.  So, I was able to head to the Haven to play. :) 

I decided to work on the challenge sketch again and see where I could go with it.


My Groovy Fhiona needed to be used and colored, so I got her out for this one.  After I colored here, I needed to cut her out .... and I missed it just a little when I put the die on.  I almost trashed it, but decided I could still use her.  What do you think??  Do the holes in her head distract you???? (made you look for 'em, didn't I??? :) )


A die from Clear Dollar Stamps was used to cut the image layer, and a Spellbinders' die was used for the background of the image.  The awesome Peace Sign was cut using a die from the Groovy die set by Your Next Stamp.  The "groovy" and flowers were also cut with YNS dies from the Goovy Die Set.  I used Copics to color little miss Fhiona. :) 

Ok, I'm really tired tonight, so I think I'm going to try to get to bed early.  Another challenge card will be posted in the morning.

Have a wonderful Labor Day and a great, big, beautiful tomorrow!


~*Shell*~


Tuesday, August 27, 2013

YNS August Challenge Card #3

Do you ever find an image that you just love and you can't stop creating with it???  This is my 2nd card for this month with the same stamp.  It's just so cute!  I couldn't resist.  Hope you aren't tired of her.  I'll do a different image next time ...... maybe.


It's sweet, little Windy Day Fhiona again.  This time, I changed the colors a bit.  I went with a brighter, less fall-like color scheme.  My princess would normally be in pink, so I thought it was appropriate - regardless of the season. :)  I liked how it came out.  


I used a Spellbinders' die for the flower shape behind the image.  The pink layer is embossed with a leaves Sizzix embossing folder, and the side of the gray layer is embossed with a side folder.  The adorable flowers were cut with a die from the Spring Die set at Your Next Stamp.  The lace is some that I had on hand from putting it on the bottom of one of the princess' dresses that I made. I think it works great on this card, too.  The image is, of course, colored with my precious Copics. :) :)

Let me know what you think! :) 
I made this card today just before we left to go to the barn.  Yep .... I was back on a horse. :)  Today was the first day that I have cantered in over 6 months.  A card made AND cantering ... what could be better than that??  :) Tomorrow is a busy day.  Hope you make the best of it!  I'm gonna.

Hope you have a great Tuesday and a great, big, beautiful tomorrow.

~*Shell*~

August Birthday

My mother-in-law's birthday was just last week, so it was time to create. :)  She seems to really enjoy the cards I make, so I try to make them special for her.

While the image isn't from Your Next Stamp, the inspiration for the card came from their sketch challenge.  I love that their challenges are up for a whole month.  Lately, it seems that I don't get time to create until the end of the month.

I wanted a classy, light feel to the card, so I used the dandelions stamp and the great floral square die.  The background of the image layer is colored with Copics.


The green background paper is embossed with a dandelion embossing folder.  I think it really added to the feel of the card.

Hopefully, I'll get the opportunity to create a few more cards for the challenge. The last Friday of the month is this week, so I want to enjoy the challenge as much as I can while it lasts. :)


Have a beautiful Tuesday and a great, big, beautiful tomorrow.


~*Shell*~

Monday, August 26, 2013

Happy Fall???

 Happy Fall!!  Ok ... so not really.  It's the end of August here in Georgia, and our temperatures have been far from normal.  On the 16th of August, our high was in the low 70s.  Global warming, huh?  Yeah, right.  Anyway, the cooler temps brought a desire for the cute fall cards that I usually start in September or October.  I've been waiting for a chance to use this precious stamp, so I grabbed my ink, Copics, and the inspiration sketch and took off. :)


Windy Day Fhiona is just sooooo cute!!  I added a scalloped oval from Spellbinders and used a doodle/swirl embossing folder n the caramel layer.


A windy day just calls for a kite, right??  :)  I grabbed the kite die from the spring dies at Your Next Stamp and popped it up to give it a lot of dimension.


The little leaves came from a die set that Clear Dollar Stamps put out a couple of years ago.  Seems like forever since I've been a DT member with them!  I soooo enjoyed that.
The leaves are colored with Copics and popped up with pop dots.

I'm enjoying the Friday challenges with YNS. I'll have another one to share later.

Have a wonderful Monday and a great, big, beautiful tomorrow!!


~*Shell*~