Saturday, January 31, 2009

Copics on Stamps?!! Oh, Yeah Baby!

There are articles out there about using Copic markers on rubber stamps. I have to tell you, the thought of putting alcohol ink on my precious stamps freaked me out! I finally couldn't stand it anymore, though. I HAD to try it.


I colored the truck with the markers. Then, setting the truck aside, I used my blender to get the entire area of the paper wet. When it was wet, I applied the already-colored stamp to the white GP paper. It stamped BEAUTIFULLY!!! I was thrilled. Of course, my next move was to apply a bunch of Stampin' Mist to the stamp and let it sit for a few minutes. It has a conditioner in it. Hopefully, that will help my stamps to not dry out. I must say, though, that I loved using the inks in that way and will do it again. :)


All paper was SU except the white. It was Georgia Pacific. VersaMark is used in the background and on the 2nd truck layer.


The '2' was cut using my Cricut (original) and SCAL. I don't remember what font I used, but it worked perfectly for a 2 year old's birthday.


On a side note, my very *dear* hubby has been working on a stamp shelf for me to hold my individual stamps. It is so wonderful, and I just want everyone to share in my excitement.


No. This is not the exhaustive supply of my individual stamps. I have gone through my stamps and have chosen these to put out for the moment. I have some that need to be mounted on wooden blocks (blocks generously sent to me by Sue!!) and some that I may pull out from my storage boxes. I have 5 tackle boxes (BIG) full of stamps that are presently not out for use.

Anyway, is this shelf great or what?! I have an awesome husband!! Hmmmm ... maybe I should tell HIM that. :)


I hope all of you have had a phenomenal Saturday and a great, big, beautiful (and blessed!!) tomorrow.

Thursday, January 29, 2009

As Promised : A Little Late

Some time ago, I asked JenC for a very, very cool .cut file that she designed. What an awesome job she did creating that file. Wow. I mentioned to her that I would like to make a tutorial of how to put that beautiful ornament together using her .cut file. She said that it would be fine, but ... I'm just now getting around to it. Sorry!!!!

Because I'm late, I'm going to show a Valentine's Day ornament/card instead of one for Christmas, but you make yours just any way you'd like. :)


Supplies - light weight paper for webbed part (light weight, designer paper is good for this) heavier paper for the base (good and heavy to help hold the ornament open when it is hung). paper for the small ornament piece inside the webbed part (any type of paper is good for this), adhesive (I used ATG), embellishments, string or cord (I used SU's silver cording)

For my project I used - Real Red SU paper (NOT recommended for the webbed piece, but I needed something a little sturdier to work with while doing the tutorial) and Whisper White SU paper

To begin the ornament, comment on JenC's blog and ask her for it. When you create an ornament and put it on your blog or in your gallery, give her the credit for creating the file. :)


Open the .cut file in the Cricut Design Studio. I changed the file *just a tad* to add a smaller circle to add to the back of the base of my ornaments and put it on the same mat as the other pieces. This allows me to add a contrasting, lighter color to the back so that I 
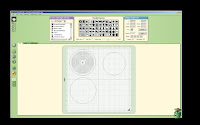
can write a note on the bottom for the person or people to whom I send it. I am also able to cut all 3 pieces (regardless of color) at the same time.

Here's a picture of the file with my extra circle added.


Put the paper on the mat. I put 2 colors on the mat at the same time. The webbed part and the base to match it will be red. The extra, smaller circle will be white to contrast with the red and to give me a white area on the bottom of the ornament to write a note to the recipient.

Put the Plantin' Schoolbook cart in your Cricut, and load the mat.

Press "cut" in your Design Studio software. Make sure your Cricut is connected to your computer.


When the program has completed the cutting, unload the mat, and take off the outer parts of the paper - not the actual ornament pieces.
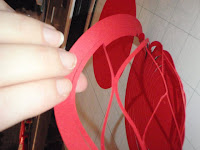


It's time to remove the ornament pieces, BUT .... *be careful* with the webbed circle. It is very delicate and will tear easily as it comes off of the sticky mat. You must be uber gentle with this step.


After the ornament pieces are off of the mat, you may want to 
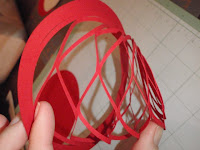
stretch your webbed piece a bit to get it into shape. Again, be gentle. This time, though, you don't have to be quite as careful. It is, after all, made to stretch.


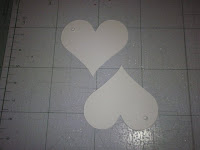
Because I'm making a Valentine's ornament, I used red, white, and pink as my colors. Little white hearts (also from Plantin' Schoolbook) were cut using the Cricut and are used as my little inner, hanging ornaments. Make sure that you have a hole in your little pieces, or you will need to cut one so that it can hang inside your ornament.


Next, adhere your contrasting circle (if you have one!) to the bottom of the big circle. Typically, I use another color, but white worked well with the Valentine's theme this time.


Because I want my hearts to be heavy enough to hang well inside the ornament, I doubled them, adhered them back to back with dimensional glue dots, and to the edge of the hearts, added the Primas with a cute, heart brad (MM??? Maybe? I don't know where I got those.) in the center.


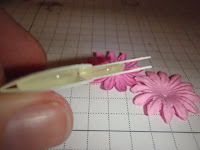
Slip the string, cord, or ribbon through the hole(s) on your inner ornaments (my hearts!), and pull both ends through the hole in the webbed part of the ornament so that when you hold it up, you can make tie a knot to make the string into a loop to hold the ornament on the tree or place it will be hung. Decide how much of the string needs to hand down inside the ornament. Hold the string there to mark the place. Pull it from the ornament, and tie a knot there. That will prevent the inner ornaments from hanging right at the top of the webbed part when the completed ornament is fully open.


Then, slip the strings back through the hole in the top of webbed portion and tie a knot (bigger than the hole!) in the string making a loop out of the whole thing. As you can see in this picture, you want a little bit of the string hanging down on the inside. That's why we tied the knot in the last step.


Put adhesive around the edge of your base, being careful not to get it in the center or where the pieces of the web will stick to it.


Adhere the pieces together to complete the ornament. Make sure you get the base and the bottom of the web lined up as closely as possible.


Embellish your ornament as you wish, but keep the base heavier than the webbing to ensure that it opens when it hangs.


Now, take a picture and share it on your blog, in your gallery, on your MySpace, or somewhere!!! Everyone needs to see these beautiful creations. And, don't forget to tell JenC thanks for all the hard work she did on the .cut file!! :)


Write a note on the back to a friend, flatten the ornament, put it in an envelope and send some joy to a special person in your life!! :)


I'm sorry that I didn't get this up sooner, but with the holidays and reorganizing the Haven, it just got lost in the shuffle. If you have questions, PLEASE contact me!!! I would love to have a chance to help you. Please, however, DO NOT ask me for the .cut file. That is the property and design of Jen, and if you want it, you need to go to her personally! :)


As always, let me know what you think!


Tomorrow, I should have pictures of my new stamp shelves (for individual stamp storage) in my Haven. I've not seen them yet. Hubby is surprising me with them!! :) I can't wait to see them!!!!


Stamp happy, and have a great, big, beautiful tomorrow!!!

Wednesday, January 28, 2009

Neglected???

In the past, I've raved about the Watercolor Wonder Crayons from SU. Has my excitement over them dwindled? Has my use for them been replaced by my Copics? Have I removed them from my workspace? NO way. LOL! I love those crayons. They give such a beautiful, watercolored look to images.

So, I'm posting this card in honor of those precious crayons. :)

A family friend is very ill and in the hospital right now. This card was made to let her know that our family is thinking about her. The crayons were colored on a stamp that had been lightly misted with water. The image was stamped on Georgia Pacific paper with a large basic gray layer as the background. Gray ink was used on the edges of the image layer. "Thinking of you" was stamped in basic black and pink (SU) brads were used in the middle of each flower. The pink taffeta ribbon was added to match. It's a very simple card, but effective for the purpose. I think it could be used for many purposes, though. It would be a very pretty birthday, sympathy, or Mother's Day card, for example.


I still love my Copics, but I will continue to use and love my WWC, as well. Each one has a place, and they can't replace each other. :)

Tomorrow, Copics coloring *directly* on my stamps!!! Yikes!! :) I will tell you how I did it and how it came out.


Have a wonderful night and a great, big, beautiful tomorrow!!!

Tuesday, January 27, 2009

Creating in the Haven

I think that I will try to post a card each day for a few days. I don't make a lot of cards at one time - as you've probably figured out, and I've made 5 in the last 2 days. I'd like to share them all, but thought that it might be nice to spread the love over a few days. :)


Today's card was made for a 7 year old boy's birthday. He had a fire station party, but I didn't have a fire truck stamp (what's up with that?!). I know of no little boys that don't like pirates, so that's what I went with. I love this set from SU. It's just too stinkin' cute. The images were stamped with Autumn Leaves' Stampology stamp pad in black. This pad is really made for clear stamps, but I've found that it works well with my Copics (until my Memento or Nick Bantock pads can get here ....). The lowest layer is Basic Gray (all paper is SU except for the white) and is stamped in white craft ink (SU) with the map image from the set. I distressed the edges of the gray, as well as the sentiment layers. The colored brads are also SU. I lightly stamped the map image over the Ahoy, Matey sentiment just to look like that was stamped on an old piece of map paper. All images were colored in with Copic markers. The green layer on this card was something a little different with the colors that I had already used, but I really liked how it turned out.


This shows the sentiment up close. I crinkled it up, distressed the edges, and put ink around the edges to make it look worn. It is layered on a Real Red square to go with the pirate boy's hat.


As always, I can't wait to hear what you think!!!

Have a great night and a great, big, beautiful tomorrow.


:)

Wednesday, January 21, 2009

Recreating the Haven

Each January, it seems that my hubby and I are inevitably rearranging, redoing, and recreating my creation space, a. k. a. The Haven. This usually happens because I am blessed with new 'toys' for Christmas, and the space needs to be revamped to make space for them. Last year, my hubby decided that he was going to work on one room each month. Yep. January was the month for the Haven. Last year, we put up some new shelves and fixed a nice space for my daughter to play while I'm up there and for my son to 'create' his own stuff. Before January 2009 was close, I KNEW what I wanted to have happen this time. I wanted a new paint job!!!! We had so many holes and messed up places on the walls from bad 'solutions' to my organizational issues that I just needed nice, fresh, clean walls for a change. All holes are patched and all walls are painted. The color that I chose was Heffalump Purple - a Disney color from Home Depot.


The original color was a brownish/taupe. Nice and neutral, but blah for a creation space. ;)


For Christmas, as I've mentioned previously, I received some Copics. I have, since, 'acquired' a few more. (really big grin!!) I wasn't happy with the storage boxes that came with my Ciao sets, so I went searching for something else. Some of the markers that I have added to my collection are Sketch markers and don't fit in the Ciao cases, too. While looking around, I found these. WOW! That would work perfectly for my space. I really like to have the markers at my fingertips, and this just about does it for me. They are stackable and hold up to 36 markers in each one. So, that was another 'little' change that I wanted to make to the Haven while we were working on it.


This is my work area. My punches, scissors, ATG, and other 'hand' tools are up on the pegboard. The new Copic block stand is on my right side next to the pegboard. My main ink holder is on the left side (LOVE that ink pad holder - before you ask, it's by DzynTech, and is no longer available. :( Sad because we could sell a billion of them if we could find them), and my black, Versamark, and StazOn inks are in the holder on the right side next to the Copics stand.


Because a few have asked, here is my Copics holder in it's place on my table. I love it. It is only about 5 1/2 inches square, so it doesn't take up enormous amounts of room. As you can see, the markers are pretty much at my fingerprints. I have them arranged in color groups (B, BG, RV, R, YR, YG, etc) so that I can find the ones I'm looking for easily.


Another thing that I needed to incorporate into my space was a sewing area. A sewing machine really needs it's own table with some storage and space to spread out that fabric. I'm DEFINITELY not a seamstress, but I do enjoy putting together some blankets and other little (EASY) things. When looking for a sewing/cutting table, I found this. I used some of the Christmas money that I had and bought this. I didn't think it would be very spectacular for only $100, but it was worth a shot. I didn't have anything better and couldn't find anything else for less than about $600. (Yikes ... and NO thanks. :) ). When I got it home and put it together, I decided that it is wonderful!! I love it. No, I've not sewn on it yet (tomorrow, though .... ), but it looks good, works well, holds a lot, and is very versatile. Works for me!


Here's the sewing center in my Haven. I have it open in this picture, but it closes up nicely. It opens to about 5' 3" long which is handy to use when spreading out fabric.


My Cuttlebug has a dedicated area, too. This cabinet top is very stable and works great to hold my little bug. My small dies and embossing folders are in the clear storage thing behind the Disney box. The Disney box (made for me by a great Quacker Secret Sister) holds my A2 embossing folder and large dies. I love that it will close with the folders and dies inside. As you can see, my son's CuttleKids shares this area. It works well for both of us.


This is my Cricut, cutting, computer, and embellishment area. The brads and such are in the brown and black box under the shelf. It has a TON of compartments for small embellies. Primas are on the 2nd shelf on the right. My Cricut Expression is to the right of this picture, and my little one is in the middle of the picture. Hanging on the wall are the mats for my Cricuts. I like having them close to my bugs and hanging to keeps them flat. Also, all 3 sizes fit easily here.


My son has his own stamps and crafts, so he needs a place to create. This is his area.


My room has a great window bringing in wonderful natural light. Hopefully, I will be able to 'create' some simple curtains for the window. I don't want much, but it definitely needs *something*.


My SU sets have a home here. They are sorted by catagories. The bottom shelf holds my assortment of vinyl (I use this with my Cricut! :) Great stuff!), and the CD stand holds most of my clear stamp sets.

The plan is to have an area for my individual stamps on the wall to the left of my stamps in this picture. It will, hopefully, be a framed box with shelves for the stamps. The shelves will only be wide enough for one row of stamps per shelf. I don't want to have rows of stamps to hide other stamps. Hopefully, this will work. Until now, I have stored all of my individual stamps in 5 *big* tackle boxes. Because of the size and number of boxes, the tackle boxes stayed under my work tables, and the stamps were never used. I won't be able to store all of my individual stamps on the new shelves, but at least some will be there and will, hopefully, get used.


I'd love to know what you think! I will post about my room again if/when I get the curtains and/or individual stamp shelves done.

Happy stamping, and have a great, big, beautiful tomorrow!


:)

Saturday, January 10, 2009

"Copping" a New Attitude

This Christmas, my wonderful hubby asked me for a Christmas list. Sure Cuts A Lot was one of the first things I listed, but next came Copic Markers. I had heard soooooo much about them and had seen such wonderful coloring done with them. I just *neeeeeeeeded* them. :)

As I said, he's a wonderful hubby, and he bought me 2 sets of Ciao markers from Clear Dollar Stamps. I tried them .... and then proceeded to use Christmas money to buy the other 4 sets that CDS had. :) (Yeah, yeah .... I got some of their fantastic stamps, too!!!). Since then, I've been to Hobby Lobby to acquire 6 more. It's very addicting!!!!

I never bought the SU markers. I just couldn't justify the money for just another set of markers. I use the WWC and all of the inks. I was satistied with that. Once I tried the Copics, though, I knew that these were not just another set of markers. They are fantastic and totally fun!!!! I still have much to learn about using these new toys, but what fun they have already been.

Here are a few examples of my Copic-ing. :)


I used left over pieces from one of my challenges to make this card. The designer paper, snowflake, ribbon, and image are all from that challenge. The image is colored with the Copics, and the snowflake is outlined in the Copic ink.


This card shows my love of snow and winter. Everything is colored with the Copics. The edge of the paper is embossed with little dots. I used one of the edge embossing folders for this and ran it through the Cuttlebug. The snowballs are tiny pom poms that I had on hand. The stamps are from CDS. :)


Another card with the same set. Again, it's colored with Copics andd uses SU paper. More little snowballs on this one, too.


This card is going out as a birthday card to a friend later this month. I loved coloring this one because of all of the detail. The Copics made it so much fun!!!

The set is one that I found on sale somewhere and has a lot of fairies. It's stamped with Staz-On and colored. Around the edges of the black layer, I used Brilliance silver. Some bling really helps set this card off.


If you don't have Copics, you need to RUN to CDS and/or Hobby Lobby to grab some. They are awesome and so easy to work with. They are also refillable and made to last a lifetime.


As always, live the life, and live it well.

Thursday, January 01, 2009

Challenges!

Because of the holidays, I was just able to get to my December and January Challenges from my Challenge Swap thread. So, today, I'm sharing both of them with you.


This challenge was sent with designer paper (behind the image here), the ribbon, 3 snowflakes (I used 2 on here), the image of the boy making the snow angel (LOVE it!!), and the mittens (among other images that I didn't use here.). I used the snowflake Cuttlebug folder with Basic Black SU paper and highlighted the embossed areas with Brilliance Platinum. The images are colored with my new Copics (ordered from Clear Dollar Stamps)!!!!! LOVE those markers!!!!!!!!!!!


The mittens were colored with the Copics, too, and hung with hemp twine. They were adhered with Stampin' Dimensionals, and the twine was put under the mittens.


The second challenge was similar in that we had snow images to play with. This one, though, we were suppose to use NO red or green on the card. I had one of the other images colored, but realized too late that I had used red on the lady's scarf. :( I really liked that image, too. Oh well. I like the way this one came out.

The embossed layer was sent as part of the challenge, as were the images, snowflakes and bling, ribbon, and sentiment. I used the Copics to highlight the snowmen and around the sentiment oval (cut with the SU oval punch). I used the smaller SU circle punch for the snowmen layers and the larger one for the silver layers behind the snowmen.


I hope all of you get a chance to create/stamp/color in 2009!! Happy New Year (and have a great, big, beautiful tomorrow!!)!!!!!!


:)