Tuesday, April 27, 2010

Pick-me-up!

I love the pickup set from SU. It's such a cute set to use for so many reasons. A young friend from church had lung surgery last week, and I wanted to let him know that we were thinking about him. I made this card to cheer him up a little.

Photobucket


The stamp was transferred into SCAL so that I could cut the shape, stamp it, and make a shadow to match. It worked wonderfully. The shadow was cut in navy and the stamped, cut-out image was put up on pop dots to add more dimension. The card base was also cut in SCAL, as well as the circle layers. The gray layer was embossed in circles using the Cuttlebug.

Photobucket


Gelly Rollz glitter pen was used to add some sparkle to the hub caps and the truck was colored with Copics. The inside image was also put on pop dots.

Photobucket


All paper was SU, as well as the image. Memento ink was used to stamp the image.

Photobucket


Hmmmm ... now that I think about it ... I think I forgot to sign the card...... Oh well. He knows SOMEONE was thinking about him. :)

Have an awesome Tuesday and a great, big, beautiful tomorrow!


~*Shell*~

Sunday, April 25, 2010

Congrats, Grad!

Looking for a good graduation card? I really like the way this one turned out. It can be made with any color combination - to work with any school colors. The internet was searched to find a good graduation cap image to use in SCAL. The image was traced. "Shadow" was selected, and that shadow image was welded to a rounded rectangle to make a card. An 'unshadowed' image was used as the main layer. This card was done in basic black and white because it was for a college graduation, and I wasn't sure about the college colors.

Photobucket

I think the cut-out card really makes a statement, but it needed a little 'umph.'
So, I got out some gold thread. Photobucket

Using the Memento ink pad case, I wrapped the thread around to form a 'tassle.'

Photobucket

It was a great size, but did trim it down just a little bit length-wise. It was a little long. The bling of that gold thread really added some punch to the card.

Photobucket


A stamp was used on the inside of the card to add a little sentiment.

Photobucket


This is such a striking way to celebrate a graduate. If anyone needs help converting files from .jpg to SCAL, let me know. Get the most from your Cricut and SCAL!!!! :) :)


Have a beautiful Sunday and a great, big, beautiful tomorrow!!!


~*Shell*~

Saturday, April 24, 2010

Monthly Challenge Swap

This month, our challenge supplies included some super cute SU images, paper, and ribbon. I love coloring the images, so I picked out one of my favorites and grabbed my Copics.


Photobucket


The background layer (purple), white layer, image layer, designer paper under the image, and the black card base came with the challenge pieces, as did the black and pink ribbons. The flower brads are from Spare Parts, I think.

Photobucket


This card has simple lines and nothing cut using the Cricut, but I really like the colors and charm of this card.


Up next ... a great graduation card using SCAL and the Cricut. Stay tuned!


Have an awesome Saturday night and a great, big, beautiful tomorrow!!

~*Shell*~

The purple background was embossed with the Cuttlebug

Thursday, April 22, 2010

Encouragement

Well, this wasn't the card I was going to post today, but the other card is still on my phone - and my 4 year old is using it (see me rolling my eyes..). I will post that one on Saturday, I hope.

This card isn't anything spectacular, but I thought that it came together well and that it has a very 'male' feel to it. It's tough to make a good masculine card, and this one was for encouragement. That made it a little harder.

Recently, I made, and posted, a card that was made for Austin while he was in basic training for the Air Force. This card was also made for Austin to encourage him on a special weekend that he is attending.

Photobucket

The image layers were cut using SCAL. The background was stamped with images using VersaMark, and the background of the image layer was embossed using the Cuttlebug. The sentiment and cross are from an inspirational, rubber, unmounted set that I got from Hobby Lobby, I think. Little gold, self-adhesive beads were used in the corner to add a little bling, and the image layers were put on pop dots.

Photobucket

All paper came from SU. :)


Challenge card on Saturday (I hope...).

Have a fantastic Thursday night and a great, big, beautiful tomorrow!!


~*Shell*~

Monday, April 19, 2010

M-I-C .... K-E-Y .... M-O-U-S-E

Another tri-shutter card sounded like a great way to celebrate a friend's birthday. This one needed to be connected to Disney in some way, so I did it in red, black, yellow, white, and blue. :)

The front of the card -

Photobucket


Mickey was cut using SCAL and a great clip art piece online. The only thing I separated was the tongue so that I could do that in red. I did both cuts at the same time, though. All plain cardstock is from SU, but the patterned paper is from a Disney set. The cut layers what the Mickey image is on, as well as the blue background for that layer, were also cut using SCAL.


Photobucket


All flowers were hand crocheted by me. :) The ribbon is SU gingham red, and the stamp set with the sentiment is also from SU.

Photobucket

The little Mickey crystals and gold middles of the flowers were from Hobby Lobby.


Sure hope she likes it!! Happy Birthday, Kristen. :) :)


Let me know what you think.


Have a wonderful Monday and a great, big, beautiful tomorrow!!


~*Shell*~

Thursday, April 15, 2010

Arghy Birthday

My daughter has a birthday party to attend on Saturday. It's for a girl and a boy - brother and sister - that are almost exactly one year apart. The princess flap card from a few days ago is for the 5 year old little girl. The card today is for the little boy.

The Ahoy Matey set is sooooo much fun to play with and to color.

Photobucket

All paper used is from SU and the Ahoy Matey set is also from SU. Copics were used to color the images. This is a double-fold card.

Photobucket


The inside was covered to allow for the sentiment and signature. Two larger brads allow the hemp twine to wrap around to keep the card closed. A piece of sandpaper was used to 'roughen' the surface of the card base and, after noticing distress on the surface of the brads, to roughen the surface on the brads. A gel glitter pen was used to add some glitter to the sword, hook, and treasure chest. I think Zachary is going to love his card, and while looking for his gift, we found an awesome book of pirate puzzles just for him! :)


Let me know what you think. :)

Have an awesome Thursday night and a great, big, beautiful tomorrow.


~*Shell*~

Monday, April 12, 2010

Happy Birthday, Jonah!!

Tomorrow is my son's 14th birthday! :) He's an amazing kid, and I'm so proud of the man he's becoming.

Photobucket


One of the cards I made today was just for him. Last month, I used some of my Sale-A-Bration rewards to get Surf's Up. This would be an excellent set to use for a boy's card. It worked really well for this one, though.

With the surf board, I wanted a Tiki bar setting. I searched the internet and found one to use. The tiki bar was copied, traced in SCAL, sized, and cut twice. It was cut once in brown and once in green. Then, the top was cut off of the green to add to the brown. The green and the bottom of the brown were embossed in the Cuttlebug before being adhered to each other. The green top used regular ATG adhesive at the top and a line of pop glue dots (two layers) at the bottom. This gave it a look like a sloped roof.


Photobucket

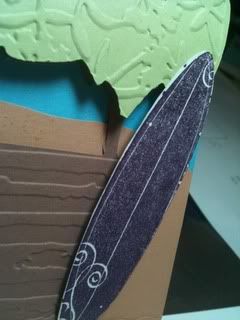
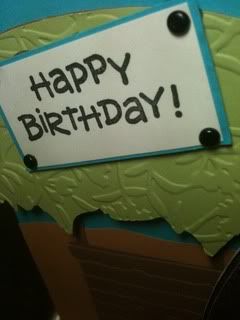
An oval was created in my graphics program that was identical in size and shape to the surf board image. That was transferred into SCAL and cut. Using the Stamp-A-Majig, the surf board was stamped on the oval Pop glue dots were used behind the surf board when adhering it, as well. The Smile set was used for the Happy Birthday, and four black brads were used on that to make it look like a sign on top of the Tiki bar.

Photobucket


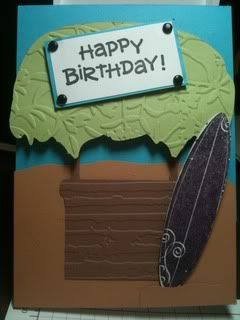
I wish that I had used Swiss Dots to emboss the sand, but I didn't think about that before I adhered all of the background layers to the card. I'm basically happy with the way the card turned out, and I think Jonah will like it, as well.


I'd love to hear your thoughts!! :) Let me know what you would do with this card.


Have a great day today and a great, big, beautiful tomorrow. I know that I'm going to have a wonderful tomorrow because I'm going to spend it with the most awesome 14 year old in this world. :)


~*Shell*~

Saturday, April 10, 2010

Flap Card

Having a girl in the house after 14 years of only boys really changes the birthday cards you have to make. :) We're doing a lot of princess parties and cards lately. Continuing on my list of cards/techniques that I wanted to try, next on the list was the Flap Card.

The tutorial for this card uses the Coluzzle and tiny magnetic closures. I didn't have (or use) either, so I improvised. I used the Cricut to cut my strip - it was 3 1/4 x 10 3/4, a little different from the instructions and added a crown for the closing flap. I had a larger magnet set and used that for my closure. I used pop dots to set the layers up over the magnets so that they wouldn't stick up under there.

Here's the inside of the card.

Photobucket


All cardstock is SU, but the patterned paper was found in the $1 Spot at Target. The crown image was found online and converted to SCAL The princess set is from SU, as is the sentiment set. The princess was colored with Copics, and the crown was adorned with self-adhesive crystals. The crown was also embossed with the Cuttlebug.

Photobucket

This was a fun card to make, and I look forward to making others with different flaps and themes.


I look forward, too, to your thoughts and opinions!

Have an awesome Saturday and a great, big, beautiful tomorrow.


~*Shell*~

Friday, April 09, 2010

Tunnel Vision

A Tunnel Card ... that was next on my list of 'challenges' for myself. The time to tackle that one came yesterday. Such a cool card ... but my, my! That one does use a LOT of cardstock. There may be ways to conserve, but for the first one, a lot was used. I will have to work on some conservation techniques if I choose this type of card again.

I used the tutorial on SCS to create my first one.

The outside of my first tunnel card -

Photobucket


All cardstock is SU. The stamp set used was Upsy Daisy and the birds are from See From the Heart (I think ...). The dark pink layer was embossed with the Cuttlebug, and the flower embellishments are from Hobby Lobby. Only black Memento ink was used on this card.

The inside of my card looks like this -

Photobucket


The oval was cut using SCAL and the Cricut. The inside oval layer was sized and cut that way, as well. Next time, I will use a different shape and have a little fun with it. I think some 3D image use there would be a blast. Oh, the ribbon is black SU grosgrain, and the pink is from PTI, I believe.


So, what do you think? Gonna give it a shot? It really is a lot of fun. I hope you try it. I would love to see what you do with it.


Hope you have a great day and a great, big, beautiful tomorrow!!!


~*Shell*~

Thursday, April 08, 2010

Ooh-rah!

My son, as some of you know, is a US Marine, and he's presently in Virginia. We text often, but I've not sent him much real mail. I decided yesterday that he probably could use a little 'happy' mail, so I created a card for him last night.

It's certainly not the most flamboyant or extraordinary card, but I think it will work for him. The shapes were cut using the Cricut and SCAL (bet you knew that... :) ), and all paper is from SU. The stamps are from a Marine unmounted set that I bought online just after Christmas. I stamped it three times without reinking it. The backgrounds were corner-punched with a punch that I've had for several years. Not sure where it came from. Simple black brads were used on the layers.

Photobucket


And, I ran across a great hint for Cricut users today. If you use one, you should check this out!!

Let me know what you think!

My next project is a Tunnel Card.


Hope you have an awesome Thursday night and a great, big, beautiful tomorrow!


~*Shell*~

Monday, April 05, 2010

Pretty Bitty Bow

There have been a ton of tiny flowers created around here lately. I'm literally 'hooked' on crocheting them. So, for what should I use them?? In the past, they've been used on cards, but I decided to create some to use on a bow for my daughter to wear on Easter. Her dress is pink and white, so that called for pink flowers. The intent was to use pink AND white, but there just wasn't enough time to get both pink and white done. I had 5 pink ones done on Saturday night, so I ran upstairs to the Haven to see what I could do with them.

Four flowers line the length of the barrette and one sat on top of the center two flowers to give a little dimension. A strip of SU's pink taffeta ribbon was used on each side of the barrette, and tiny, self-adhesive pearls were used for the center of 3 of the flowers as well as at the ends of the barrette and on the ribbon. Crystal Effects (SU) was used to adhere the flowers to the barrette, the ribbon to the barrette, and the pearls to the flowers and the ribbon. I wanted the assurance that the pearls weren't coming off, and I didn't trust the 'adhesive' on the back of them. Other than crocheting the flowers, the bow took about 5 minutes to throw together and worked perfectly with her dress.


What do you think?

Photobucket


And in her hair ....

Photobucket


My goal tomorrow is to work in the Haven for a while. My precious princess has a new bed that I need to put together, as well, but hopefully, I will be able to create ... something ... to show on here this week. :)


Please let me know what you think of the bow. No, I didn't use my Cricut or stamps for it, but I couldn't have done it without my stamping/crafting supplies.


Have a fantastic Monday night. I pray that each of you had a very blessed Easter yesterday. Oh, and have a great, big, beautiful tomorrow!!! :)


~*Shell*~

Thursday, April 01, 2010

Shuttering

Happy Easter weekend! It's almost Friday, but SUNDAY is coming!!!!!!!!! :) :)

The next project on my list to try was the Tri-Shutter Card. Wow. What a fun card when it's done!! It gives you so many places to embellish and express yourself.


This is what the card looks like lying down.


Photobucket


Opened up, the card can show it's colors and flair.

Photobucket


The card opened up with the sentiment showing.

Photobucket


The card base is SU paper. The designer paper is from DCWV, I believe. It's such fun paper that I just had to use it here. The image layer and background were cut from SU paper using SCAL. The image is from What A Hoot by Clear Dollar Stamps. The flowers came from a variety of sources. The flower brads in the center of some of the flowers are from Spare Parts. Other flowers are embellished with crystal brad centers, and self-adhesive crystals adorn the sentiment layer.

Can't wait to hear what you have to say about this one. It is such a fun card. I can just imagine receiving one of these for some occasion .... can't you????


Happy Easter. Please attend a house of worship somewhere this weekend.

~*Shell*~