Thursday, June 28, 2007

Just a card

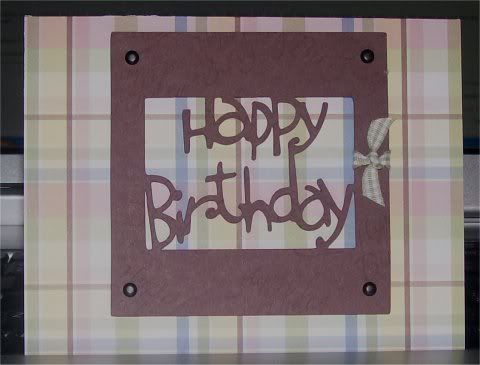
I went up to the Haven to stamp with my son tonight. He learned a new technique, so I thought I would post the card that I made while teaching him. It's a crayon resist card. I used Doodle This and Happy Thoughts. It's really not a very hard card, but I loved the variations in the colors and the softness to it. I punched the little oval first for the little tag. Then, over that, I punched the large oval. That made the frame. The tabs are stamped with Linen in Mellow Moss to add some texture.

Stamps: Doodle This, Doodle That, Happy Thoughts, Linen
Ink: Bashful Blue, Blush Blossom, Pretty in Pink, Mellow Moss, Basic Black, Going Gray
Paper: Bashful Blue, Blush Blossom, Glossy White, Whisper White, and Mellow Moss
Accessories: Blue gingham ribbon, large oval punch, small oval punch, clear wax crayon, sponge, non- SU white brads, Stampin' Dimensionals, Round Tab punch, 1/16" circle punch


More creating time tomorrow, I hope!

Tuesday, June 26, 2007

Out Of My Comfort Zone


I'm using this blog to keep me motivated on making cards. So, I decided to make a card that's a little outside my comfort zone. I used apricot and black together, which is a little odd for me. I'm not sure what I will use the card for, though!! LOL!! It looks too much like a baby card to be used for much else, so I guess that I will wait for someone to have a shower or to have a baby! So, what do you think about it??? Baby card?? Tacky?? What?????!


And here's my angel from yesterday .......


Hope you guys have a great day!!!

Sunday, June 24, 2007

Stamp on what?

My family and I went to my parents' house yesterday to do some work around their house and help them out a little. There is a little box with a door that covers the key hole for their home alarm. When her house got painted last week, the little door was painted, too. Mom asked me to 'stamp on it' and make it pretty. Sooooooo here's what we came up with.


It was her stamp set, but my stamping and aquapainting. The box doesn't get wet or get weather on it at any point, so I just used the SU! watercolor crayons and the aquapainter to color it. I used black StazOn ink and sealed it with a glossy sealer. It looks a little splotchy on here, but that's because it's wood. It's not really that splotchy in person.

Here's what it looks like up on the wall.


When we got home, I noticed something interesting while I was blowing bubbles with Jaydin.


I got a little closer and found 4 little birds in there!! They are blue in color. I have no idea what kind of birds they are - so if you know, please tell me! I think it's so cool.


Hopefully, I will get a few more things stamped this week. We'll see. I suppose it all depends on my almost-2-year-old appendage. :)


Have a great weekend and a great week!!!!


Happy Stamping!

Thursday, June 21, 2007

Yes Sir!

My 11 year old son has a party to go to this weekend, and I think that it's based on military battling and such. They are suppose to have water "battles,"and it was addressed to Sgt. Jonah, so I know that he's into the military stuff. I wanted to make a card that would work for that theme. Camo came to mind first, and then, last week, I bought the Base Camp cart for my Cricut. Ooooooooh! Love those little dog tags. The birthday boy's initials are "L T," soooo .....

I cut these cute little dog tags at 1 1/2 inches in SU! silver and cut the shadow for them in black. I was just thrilled with those little guys. They are so cute!!!!!

Anyway, I took the camo color theme and finished the card.....


Jonah was thrilled with how it turned out. He kept exclaiming over it. I'm really glad that he likes it that well.

I made a card for a friend the other day from one of the SU! Simply Sent sets. It's not like the templates that are given in the set, though. I like it pretty well. I hope she does, too!


Stamp to relax!!!


:)

Wednesday, June 20, 2007

Cutting Chipboard and Altering Blogs

Last night, I was a bit bored. I couldn't create because I was tired, so I tried cutting chipboard .... with my Cricut!!! It worked, and it did a great job. The chipboard was thin (like at the back of a memo pad or something), but it's going to be really cool to work with. I can use it to make more of the little books that I made for Father's Day or to make elements - of various sizes! - for cards and projects. So cool. I'm just thinking of all of the options with the *custom* chipboard pieces!! Now .... if I can just get time to create without my extra almost-2-year-old appendage. :)

I altered my blog - can ya tell?! LOL! I have been trying to get a good header for some time, and I finally figured it out today. I need to remake it to make it span the whole top part of the blog, and I need to fix my last post, but I'm liking it. Let me know what you think of the header. Now that I have it figured out, I will change the header more often.

Monday, June 18, 2007

Tutorial ...

I know that the tutorial for the little photo book isn't needed now, but I thought I would give it a shot anyway. Perhaps someone will benefit from it - or I will just learn how to do (or not do) one.


Supplies:
-chipboard squares (I cut mine with the Sizzix, and I believe they were 3 1/2 inch squares, but you can use any size
-5 pieces of paper to cover chipboard
-hole punch (I used a Japanese Book Drill)
-Mod Podge or strong adhesive
-ribbon of choice
-embellishments

*Step One - gather supplies. I didn't really get all of my embellishements together in the beginning because I work on the fly.


*Step Two - apply strong adhesive. I brushed on a thin layer of Mod Podge to ahere the paper to the chipboard squares. Put paper on squares and allow to dry if necessary.


*Step Three - punch holes. Using the top part of an SU! order form as a guide, I punched the holes. For the cover, two holes are punched on the left-hand side. For the other 'pages,' holes are punched on both the left and the right sides.


*Step Four - mat the pictures and embellish the pages. For this one, I used some fun stickers to embellish.


*Step Five - tie ribbon. Attach each 'page' to the other with ribbon. I made sure that the ribbons tied inward in all cases except for the first set that attaches the cover to the first 'page.'


You can see below how the ribbons are tied.


*Step 6 - fold and tie. Fold the book up accordian-style and tie with a ribbon until time to give as a gift or show off!!! I simply used a ribbon to wrap around the closed book and tied it.


:) Happy Stamping!

Tuesday, June 12, 2007

Wanna See????

Ok ... so I had an idea about what to do for Mark's Father's Day gift. I wanted to do something with stuff that I have here, and I wanted it to be something that he could put on his desk at work with the kids' pictures in them. I didn't want to use the Cricut to cut the chipboard that I have (not brave enough to try that yet...), so I had to work with the size that I had for the Sizzix. It worked out well, though. The pictures are little, but good for his desk.


Here it is open.

Photo Sharing and Video Hosting at Photobucket


And here it is closed.


Photo Sharing and Video Hosting at Photobucket


I'm really pretty pleased with how it turned out. I sure hope that Mark likes it. I may not be the best, but he will like it because I made it. He's so good about that. At least, I had everything here without having to buy anything. He'll really like that part!!! LOL!!

Jared is at camp this week, and they are having VBS at church.

OH!! I made one of those "Infinity Boards" to take pictures of my creations. I got the idea from Keri - http://pinklemonade.typepad.com/ . It works great!! I may have to get a big piece of poster board, but for the one I did today, I just used a small one. I'm thrilled with the way the pictures took.

Ok ... gotta go bathe the bug and get ready for VBS. I hope you guys have a great day!!

Monday, June 04, 2007

Altered Box!!

I've wanted to try one, but really couldn't figure it out. I sat down and did it today.


Photo Sharing and Video Hosting at Photobucket

I'm fairly pleased with it. What do you think?? It's for a friend that takes the boys to math on Tuesdays. The last class is tomorrow, so I thought I would make a thank you.


Here's a card I made with my Cricut the other day for a friend's birthday....


Photo Sharing and Video Hosting at Photobucket


I really liked this. I used my favorite cartridge .... Zooballoo!!!!!!!! Love that thing. It's so versatile.


Oh ... and here's my little bug .... What a character .....

Photo Sharing and Video Hosting at Photobucket