Monday, January 25, 2010

A Pink Rockstar!!!

Several years ago, I replied to a post on SCS about the Cricut. Someone got a new Cricut and waited - yes, waited - for quite a while before opening it. That thread grew and so did the friendships among those that posted on it. The original poster of that thread was a wonderful lady named Robyn. She has come a LONG way since the day she opened that Cricut.


She is now known as The Pink Stamper, and she now has her own line of clear stamps and Cricut instructional DVDs!! I'm so excited for her!


I hope you'll head to Custom Crops to check out her new stuff. I know you'll love it!!


More creations coming soon! Have a wonderful Monday and a great, big, beautiful tomorrow!!!!


~*Shell*~

Saturday, January 16, 2010

Hot Cocoa to Go-Go

The Frugal Crafter comes up with some really cute CDS and SCAL files. In December, I chose one of her files to make these super-cute cups.


She suggests using double-sided paper for these, but I didn't have any double-sided Christmas paper. I created my own using SU paper and stamps. Embellishments and tags added a little more fun to them. These little cups are awesome for a pack of hot cocoa and a candy cane or a gift card. I am always looking for something fun to do with a gift card.


You can find this file here. Thanks, Lindsay!!

If you get the file and create these cute cups, I'd love to see them!!


I hope y'all have a great Saturday and a great, big, beautiful tomorrow!!!


~*Shell*~

Monday, January 11, 2010

The Haven Re-floored

As I've mentioned before, every year, it seems that the Haven gets a bit of a face-lift or reorganization. Usually, this happens because I receive some wonderful new toy ... uh, tool!.... to use up there. This year, however, the tank from the toilet in the adjoining bathroom shattered in November. The floor in the Haven was affected - along with the other rooms on that level ... and the other 2 levels below it - and needed to be replaced. My dream has always been to put hardwood up there, so we took this opportunity to do so instead of replacing it with more carpet. I didn't do any reorganization this time because I really like the way it's been set up for a while.

Last year's face-lift can be seen here.


This is my work area from the door next to the bathroom.


This is the work area from the window next to the sewing area.


The sewing area, blue bins, and window. :) Stamp shelves are in the foreground on the right side.


My stamp shelves. No, they aren't new, but my hubby did such a fantastic job on them that I wanted you to see them again. :)


The room from the balcony door. My work area is immediately to the left of this. When I have classes or Bible studies in the Haven, the tables (one 6 ft and one 8 ft) go in the open space in front of the window.


My work table. My work area consists of one 8 ft. table and two 6 ft. tables in a U shape.


So, if you're ever in the area ... stop in to play in the Haven! :)


Next time, I will share some of the gift card/hot chocolate holders that I made for small gifts during Christmas.

Hope you had a great day and have a great, big, beautiful tomorrow!!!

Saturday, January 09, 2010

Prayer Cards

Isn't it always a challenge coming up with an idea for teachers' gifts? Since I homeschool, I don't have school teachers for whom to buy or create something. Instead, I sometimes give to the Sunday school teachers and Wednesday night workers that work with my 4 year old each week. This year, I needed to go inexpensive, and I decided to use some of the wonderful tools and supplies in my Haven (what a novel concept, huh?? USING my stuff... :) ).

In early December, I placed an order with Clear Dollar Stamps, and bought this wonderful stamp. I thought it would be wonderful to use for prayer cards and journals. Hmmm ... this might be just the gift for our church workers! These were also gifts to some of my family members. I made 12 of them, I believe.

I used SCAL to cut the covers (with hole) and the inside cards (again, with hole) using this font. If you don't have that font, you *really* need it!!! It's a huge time-saver and perfect for so many things.


After cutting, the inside cards were stamped, front and back, with the Prayer Card stamp. The covers were decorated using stamps, embossing, and embellishments. Each journal is different. A binder ring was used on each journal to hold the pages and covers together. Using the binder ring allows more pages to be added later.


Paper - SU (colored paper) and GP white
Ink - SU (colors and white) and Memento black
Accessories - Cricut, SCAL, pop dots, brads, ribbons, Cuttlebug and Cuttlebug folders, binder rings, Copics for coloring
Stamps - Clear Dollar Stamps (Prayer Card, Prayer Journal, Whatever, and others)


These were a pleasure to make. I hope that the recipients enjoy them and *use* them. :)

I'd love to hear your thoughts on these! :)

Hope you have a fantastic Saturday and a great, big, beautiful tomorrow!!


~*Shell*~

Monday, January 04, 2010

Competition for SCAL?

There's a lot of talk out there about Make the Cut, a new program similar to SCAL for the Cricut. Part of the hype is the ability for MTC to separate or break apart an image into several pieces or layers. In the past, we've done this with SCAL using Inscape or some other graphic manipulation program (I use Jasc Paint Shop Pro), so being able to do the layers within the same program is a pretty big draw for many.

Never fear, SCAL users. Craft Edge has got you covered!!! Version 2.06 (a free upgrade for any version 2 registered users) allows SCAL users the very same versatility in breaking apart images.

Here is an example of the SCAL ability ...


The original file


I saved this file to my computer and opened SCAL. From there, I clicked 'File' and 'Trace Image.' Within that window, I chose the file I wanted to trace using 'Browse.' I also clicked the 'Break Apart Outlines' option and previewed the image. I clicked 'Ok,' and the image was in SCAL. At that point, I needed to have the image selected and click 'Break Apart' from the 'Object' menu. Each part moved independent of the others, and I put each piece where I wanted it to be to optimize my cutting.


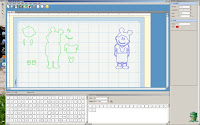
The original, unbroken file is shown on the right side, along with the broken apart pieces on the left.


Using the break apart option in SCAL is simple. Thanks to Craft Edge for adding that feature to SCAL so that MTC isn't tempting. I'm *quite* happy with my SCAL, and with their apparent desire to consistently improve their product, I think I remain quite happy with it.


Hopefully, this post will help you make a choice between SCAL and MTC or just help you make the most of the SCAL you already have.

Oh - for all Version 2 users, the upgrade is here.


Have a very happy, productive, and creative 2010!!


~*Shell*~