Friday, October 04, 2013

Need a Little Pick Up

Tomorrow, we are attending a 90th birthday party for a very sweet man, the father of one of our closest friends.  It's been a while since I've needed a masculine card, so this one was both a bit of a challenge and a refreshing change.


The little pick-up truck is an old SU stamp, but it's just great for guy cards.  The background paper is embossed with gears, and the little banner used the same folder.  I directly inked the raised parts of the gears on the banner to bring out the detail.  I distressed the edges of the background with the airbrush.


The banner looked pretty empty, but then, I remembered the keys that I have stashed away.  I picked a small, light one, and it works perfectly for the embellishment here.


The blue and brown background colors on the image layer were done with the airbrush.  I colored the truck first and then, masked it to airbrush over and around it. The truck layer was cut out using a Spellbinder's die.


The small 'pearls' at the bottom were white originally.  The airbrush was used to change them to a dark brown.  What a difference it made.  I love how these turned out.  Hemp twine was also used to embellish the card.


No challenge for this one....just a fun card to create.  I hope that he really likes his card.


Have a peaceful Friday evening and a great, big, beautiful tomorrow!


~*Shell*~

Thursday, October 03, 2013

Day Dreaming ....

Had time to create today.  I only got one card done, but I really like how it turned out.  Because I only worked on one card, I just did one challenge.  It's for the Your Next Stamp challenge, and I turned the sketch a bit to make it work with the image.


I used the Dreaming of You set (Your Next Stamp) and colored with Copics (of course!).  The butterfly is part of the spring die set from Your Next Stamp, as well as the kite, and individual flowers.  


The background on the image layer was done with the airbrush.  I'm getting more control of it and I was pleased with the effect I got after practicing a bit.  The banner on the side was embossed with flowers, and then, the raised areas were inked with white craft ink.

Your Next Stamp - sketch

Hope you're having a great week!  The weekend is on it's way ... but it looks like there's a hurricane heading our way.  Guess we'll have some rain. :)  My garden could use it.

Enjoy your Thursday night and have a great, big, beautiful tomorrow.


~*Shell*~


Wednesday, October 02, 2013

Cute Little Pouch Tutorial

After creating my little taggie owl yesterday, I worked on some little denim pouches.  These are great to use for any little things - spools, buttons, bobbins, crayons, etc - and SO easy to make.
Aren't they cute?!

So, ready to make your own?? 

Supplies - 
old pair of jeans (actually, only one leg of the jeans)
scissors/rotary cutter
sewing machine
iron
thread


Step 1 - cut the leg of the jeans to the size that you'd like to use.  


This one is about 7 inches tall.  I used a pair of my daughter's old jeans, so it is fairly narrow - about 6 inches.  
Cut both ends fairly straight.


Step 2 - sew the bottom closed.


Stitch the bottom closed.  I just used a regular straight stitch.


Step 3 - stitch another seam right next to the last one.


This is to reinforce the seam since it's denim and will have things inside.


Step 4 - iron the seam open.


This is kind of hard with the denim seams, but it helps with the next step.


Step 5 - iron a small crease into the corners to use as a guide for sewing the boxed corners. 


This just assists in keeping the right shape when you sew it.

Step 6 - sew the boxed corners


Sew across the corner - try to make the distance from the corner even on each side.  Do this on both sides.


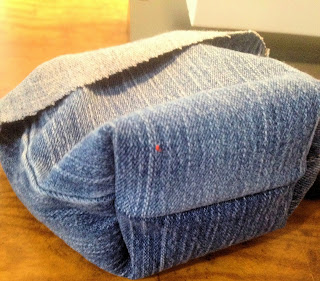
Step 7 -  flip right side out.

After boxing the corners (like in picture above), flip the pouch so that the right side is facing out.


Step 8 - fold down the top to make a cuff.


You can cuff it to the inside to finish the top if you wish.  I like the unfinished denim edge showing.


Step 9 - embellish.


Add some cute flowers or buttons to embellish your pouch.

And ... you're done!


This is a very easy project ... easy enough that my 8 year old made one by herself.


Please let me know what you think of these little pouches and of the tutorial.  Let me know if you have questions or suggestions!


Have a wonderful Wednesday and a great, big, beautiful tomorrow!!


~*Shell*~


Tuesday, October 01, 2013

Fabric Fun Day

I took today to create with fabric.  I'll get some cards done later this week.  I've had an idea in my head for quite a while about a little 'taggie' owl for little ones.  I didn't have a pattern, but found a simple owl outline online to use as a guideline.  I added some as I cut him out for the seam allowance. I hope to make a pattern and improve on the design (and sewing!) later, but I'm pretty happy with the prototype.  


Here's our little owl buddy with his wings closed.


And here he is with his wings open.  Yes, I realize that I needed to change thread for the dark part of the eyes, but I was being lazy ... :)  I think the wings ended up a good size, and I'm pleased with having ribbon feet.  The main body part is fleece with cotton wings and a fuzzy middle section. He has batting in his wings and Polyfil in his main body section.  His beak is a small piece of minky.


So ... what do you think??? :) 


Have a wonderful Tuesday and a great, big, beautiful tomorrow.


~*Shell*~